
TL;DR: Knowing how to descale an espresso machine matters because it’s the only maintenance task where skipping it actually breaks the machine. Most machines need it every 2–8 weeks depending on water hardness; the cycle takes 20–40 minutes; and the universal principle is the same whether you own a $200 pod machine or a $3,000 Jura. What varies is the procedure and the descaler — and that’s most of what people get wrong.
Descaling is the only maintenance task where skipping it actually breaks the machine. Cleaning the brew head, wiping the steam wand, changing the water filter — these affect taste and consistency, but a neglected machine still functions. Scale is different. Calcium buildup on the heating element doesn’t just degrade performance; over enough time, it terminates the machine. And it’s the one task most owners either avoid, postpone, or do wrong by reaching for the wrong descaler.
This guide covers what scale actually is and why it matters, how to know when your machine needs descaling, the universal descaling process and how it varies by machine type (super-automatic vs semi-automatic vs pod), which descaler to use and which to avoid, and what to do when something goes wrong. It doesn’t cover model-specific button sequences — those belong in machine-specific guides, and we link to ours where relevant. The aim here is the underlying logic, applicable across brands.
A note on perspective: this guide draws on two years of hands-on use of a DeLonghi Magnifica, along with research and procedure analysis across other major brands. Where personal experience is referenced, it’s flagged as such. Brand-specific procedures are covered in dedicated guides.
And if the reason you’re here is that your coffee has started tasting off — bitter, flat, burnt — descaling is only one of the suspects. I walked through every reason espresso turns bitter, in the order worth checking them.
What Scale Actually Is (and Why It Kills Machines)
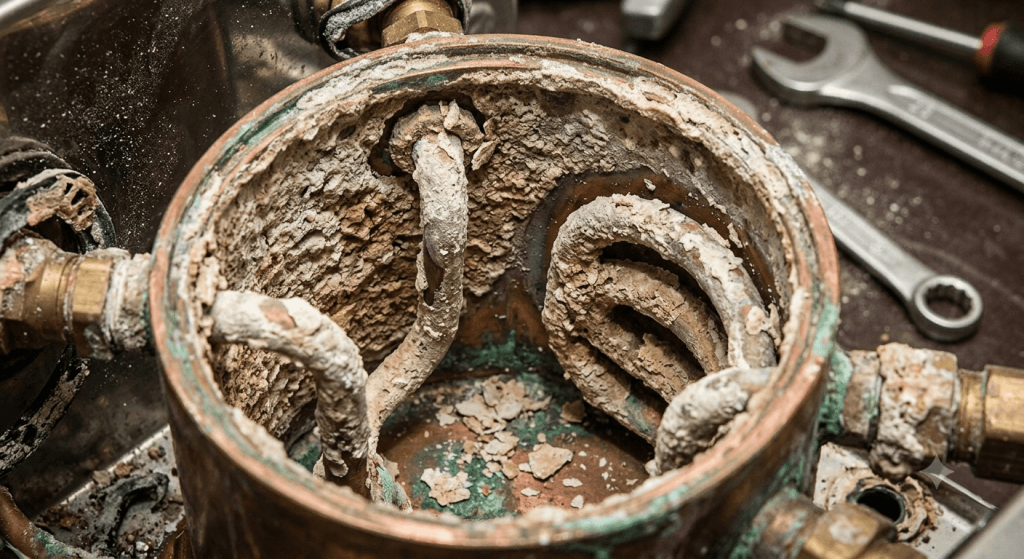
Tap water isn’t just water. It carries dissolved minerals — primarily calcium and magnesium, plus smaller amounts of other compounds. When water heats up, these minerals come out of solution and deposit themselves on whatever surface they touch. In an espresso machine, that surface is the heating element, the inside walls of the boiler, the internal piping, and any valve through which heated water passes. The deposit is calcium carbonate (and magnesium carbonate) — what’s commonly called limescale, or just scale.
Scale forms continuously, in tiny amounts, every time the machine heats water. On a daily-use espresso machine, this happens dozens of times a day. The buildup is invisible from the outside, but inside the heating circuit it accumulates as a chalky white crust on the metal surfaces.
Two things make this a serious problem.
The first is heat transfer. Scale is a poor conductor of heat — significantly worse than the stainless steel or aluminum it deposits on. As scale layers build up, the heating element has to work harder and longer to reach brewing temperature, and often doesn’t quite get there. The water reaching the coffee puck is cooler than it should be. The result is under-extraction: sour, thin shots; weaker crema; less body. By the time most people notice this through taste, the buildup is already significant.
The second is structural. Scale doesn’t deposit evenly. It builds up faster in tight spots — narrow tubing, valve seats, pressure pump intake points. Over time, these restrictions affect flow rate and can damage components. The most common terminal failure on home espresso machines is heating element burnout, often triggered by the element overheating against an insulating scale layer. On most home machines, the heating element is sealed and not economically repairable — labor on a boiler replacement often runs close to the cost of a new machine.
This holds across every type of machine that heats water under pressure. Super-automatics, semi-automatics, pod machines, manual lever machines — the mechanism is the same. What varies is the rate of scaling (driven by water hardness) and how the machine signals that it’s time to act (some have indicator lights, some don’t).
There’s a useful data point from owning a DeLonghi Magnifica for two years: when the descale light came on and was ignored for about 30 cups, espresso temperature dropped noticeably — measurable enough to taste a thinner crema and a sour finish on the shots. After descaling, the next shot tasted like the machine again. The underlying issue is similar whether you’re using a Magnifica, a Breville, or a Nespresso Vertuo: scale insulates, heat drops, extraction suffers.
How to Know If Your Machine Needs Descaling
There are three reliable signals, in roughly this order of accuracy:
The descale indicator light
If your machine has one, this is your primary cue. Super-automatic machines almost always have a dedicated descale light or icon. Mid-range and higher semi-automatics often do — Breville’s Barista Express series, newer Gaggia models, Philips machines with displays. Entry-level semi-autos (Rancilio Silvia, the original Gaggia Classic, La Pavoni manuals) typically don’t, and you’re tracking interval manually.
Important to understand: the indicator light is not a sensor. It doesn’t detect actual scale buildup inside the machine. What it actually monitors is a counter — typically based on liters of water dispensed, calibrated against the water hardness level you (or the manufacturer, by default) configured during setup. When you hit the threshold, the light comes on.
This matters because if the hardness setting is wrong, the light comes on at the wrong time. Most machines ship at the maximum hardness setting by default, which is conservative — fine if your water is genuinely hard, but means soft-water owners trigger descaling cycles twice as often as needed. Conversely, if your water is harder than the setting assumes, scale is building up before the light triggers. Setting hardness correctly (more on this below) is the single most useful calibration step on a new machine.
Performance symptoms
When there’s no indicator light, or when you want to confirm whether the light’s reading is accurate, look at how the machine is actually behaving:
- Espresso pulling cooler than usual. The drink doesn’t feel hot in the cup the way it normally does.
- Crema thinner, paler, or breaking up faster than usual.
- Brew time noticeably longer at the same grind setting, or pump sounding strained.
- Steam wand producing less pressure, or steam petering out faster than it used to.
- Subtle sour or “off” taste even with the same beans and the same grind.
Any one of these in isolation could be a grind or bean issue. Two or more together, with no other change in routine, point to scale. Performance symptoms are a lagging indicator — by the time you notice, the buildup is already meaningful — but they’re useful as a sanity check.
Time-based interval
If you have neither an indicator light nor any obvious performance change, descaling on a fixed interval is the default approach. The interval depends on three factors, in this order:
- Water hardness (the biggest variable by far)
- Whether the machine has a water softener filter installed
- Daily use volume
These are real-world estimates from owner experience, not official manufacturer intervals — your machine’s indicator light (if it has one) should always have the final word.
| Water hardness | Without filter | With filter (where supported) |
|---|---|---|
| Soft (< 7 °dH / 125 ppm) | Every 3–4 months | Every 4–6 months |
| Medium (7–14 °dH / 125–250 ppm) | Every 6–8 weeks | Every 2–3 months |
| Hard (14–21 °dH / 250–375 ppm) | Every 3–4 weeks | Every 5–7 weeks |
| Very hard (> 21 °dH / 375+ ppm) | Every 2–3 weeks | Every 3–4 weeks |
Assuming roughly three drinks a day. Heavier daily use shortens these intervals proportionally.
Get your personal descaling interval
The table above is the general guide. Answer three things below and this narrows it to your setup — water, how much you brew, and your machine type.
How this is calculated
Scale builds from the minerals in your water, multiplied by how much water passes through the machine, adjusted for how sensitive the machine’s internals are.
We start from a baseline interval set by water hardness, then shorten it the more you brew, and adjust for machine type: super-automatics run internal rinse cycles and have pumps and valves that are more scale-sensitive; pod machines pass less water but have narrow channels. A water filter meaningfully lowers mineral load, so it extends the interval.
The result is a practical range, capped between 2 and 20 weeks.
How to find out your water hardness
Two methods work for most people.
The first is your local water utility’s annual water quality report. In the US, every utility is legally required to publish one — search “[your city] water quality report” or “[your ZIP] annual water report” and you’ll find a PDF. Hardness is listed somewhere, usually as ppm or as grains per gallon (gpg — multiply by ~17 to get ppm). This is measured at the source, so it doesn’t capture what happens between the treatment plant and your tap, but for most municipal water that’s a minor variation. Most accurate option.
The second is a test strip. Many espresso machines ship with one in the accessories pouch — DeLonghi, Breville, Jura, and most other premium brands include them. If you’ve lost yours or your machine didn’t include one, replacements are inexpensive on Amazon (any aquarium or general water test strip works for hardness reading). Dip in cold tap water, wait one minute, read the color or square count against the chart. Less precise than the utility report but accurate enough to set the hardness level in your machine’s settings.
Once you know your hardness, set it on the machine — usually under a Water Hardness option in the maintenance or settings menu. After this, the indicator light triggers at intervals that match your actual water rather than the conservative factory default.
The Universal Descaling Process
The specifics differ by machine — button assignments, descaler dosage, cycle duration — but the underlying procedure is the same across virtually all home espresso machines. Understanding the universal flow makes it easier to apply your machine’s specific instructions correctly, and to recognize when something has gone wrong.
The generic 7-step process:
1. Empty the machine. Pull the drip tray, empty the grounds container, and dump whatever’s in the water tank. If your machine has a water softener filter installed in the tank, remove it before starting — descaler will saturate the filter and waste the rest of its capacity. Set it aside on a paper towel to reinstall after the rinse.
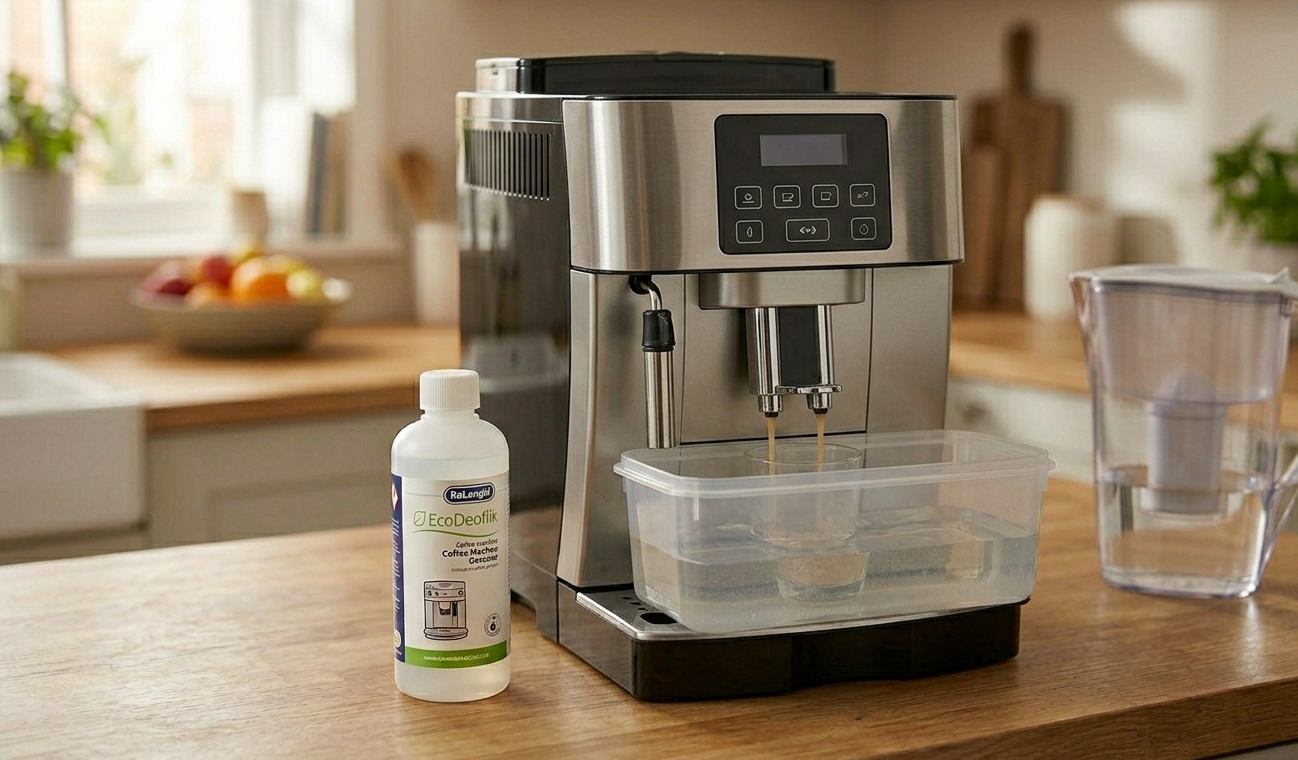
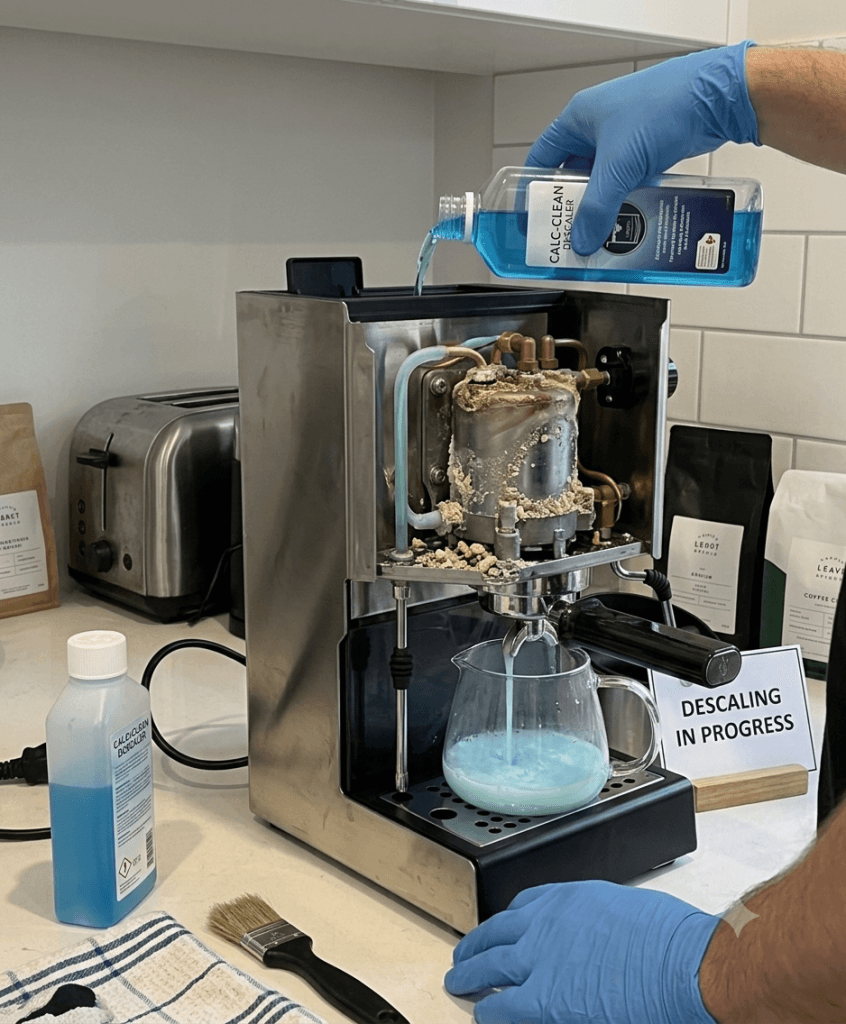
2. Prepare the descaling solution. Mix descaler with water at the ratio the product specifies — usually somewhere between 1:10 and 1:5 descaler to water. Total volume is typically around 1 liter (about 33 oz). The descaler bottle usually doubles as a measuring cup, with markings for the standard dose. Pour into the water tank and add tap water up to the indicated line. Mix gently.
3. Position a container. Place a container of at least 2 liters under the brew outlet and steam wand. The cycle runs water through both, so a single container under just the spouts will leave water on your counter. Glass mixing bowl, large measuring jug, or any flat-bottomed container works. Don’t use a coffee mug — it will overflow.
4. Initiate the descaling cycle. This is where the procedure diverges by machine type:
- Super-automatic: dedicated descale button held for 3-5 seconds, or menu option through the display. The machine does the rest automatically.
- Semi-automatic with descale function: button combination or menu option (varies by brand). Semi-automated — the machine pulses water through, you may need to manually engage the steam wand.
- Semi-automatic without descale function: fully manual. Pull descaler solution through the group head as if making a long shot (without coffee or portafilter, depending on brand recommendation), let solution sit in the boiler 15-20 minutes, repeat 2-3 times.
- Pod machine: dedicated descale mode triggered by a button combination (Nespresso, Keurig, Dolce Gusto). Simplest cycle of the four — single mode, automated.
5. Let the cycle complete. Total runtime varies — 15-20 minutes on pod machines, 25-35 on super-automatics, 20-30 on semi-autos with descale function. Most cycles include built-in pauses where the machine sits idle for 1-2 minutes at a time. This isn’t malfunction — it’s the descaler in contact with the heating circuit, dissolving scale. If the machine pumped continuously, the descaler would flush through too fast to react. Don’t unplug the machine, open the tank, or interrupt the cycle during these pauses.
6. Rinse — twice. First rinse: empty the tank, rinse it thoroughly to remove descaler residue, refill with clean water to maximum, and run a full rinse cycle. The machine pumps the clean water through the same path the descaler took, flushing out residue.
Second rinse: most manufacturers consider one rinse sufficient. In practice, the first 2-3 drinks after a single-rinse descaling have a faint chemical aftertaste — not strong, but detectable to anyone paying attention. A second rinse cycle eliminates this. It takes another 5 minutes and an extra tank of water, and it’s worth it.
7. Reset the counter and reinstall the filter. On most machines, the descale counter resets automatically when a complete rinse cycle is detected. On some older models, particularly older Magnifica S units and basic semi-autos, you need to manually trigger the reset — usually by holding the descale button for 10-15 seconds. Reinstall the water filter if you removed one in step 1. Empty the drip tray one more time — there’s typically some leftover descaler-water pooled there.
The machine is now ready for normal use. The first espresso after descaling sometimes pulls slightly fast for a few seconds before settling, because brewing temperature is restabilizing. By the second or third drink, everything’s back to baseline.
Variations by Machine Type
The universal process holds, but each machine type has specifics worth understanding — particularly if you’re trying to apply generic instructions to your specific machine, or trying to figure out whether something has gone wrong.
Super-Automatic Machines
(DeLonghi Magnifica/Dinamica/PrimaDonna, Philips 3200/5400/Series 800, Jura ENA/E/Z, Saeco PicoBaristo/Xelsis, Gaggia Anima/Cadorna)
Super-autos are the easiest type to descale and the hardest to descale wrong. The cycle is fully automated — one button or menu option, the machine handles the rest. Indicator light is universal. Cycle duration: 25-35 minutes including rinse. If you’re new to the super-auto category in general, our guide to super automatic espresso machines covers what these machines are, how they work, and who they’re actually for.
Three specifics worth flagging:
The first is descaler choice. Most super-auto manufacturers strongly recommend (and sometimes mandate via warranty terms) their own descaler. DeLonghi requires EcoDecalk for warranty coverage on descaling-related damage. Jura uses dedicated descaling tablets. Philips and Saeco share a compatible descaler. Using a generic descaler isn’t necessarily harmful but does carry warranty implications — covered in the descaler section below.
The second is milk system handling. Machines with automated milk systems (DeLonghi LatteCrema, Jura’s milk frother, Philips LatteGo) have a separate cleaning procedure for the milk path. The descaling cycle only addresses the coffee/water path. Don’t try to use descaling to clean the milk system — it doesn’t work, and you’ll contaminate the milk components with descaler residue.
The third is filter integration. Most super-autos in the mid and upper tier support an in-tank water softener filter (DeLonghi softener filter, Jura CLARIS, Brita Intenza). These extend descaling intervals by 1.5-2x on medium-hard water. The filter has its own replacement schedule, typically every 2 months or 50 liters.
For the step-by-step DeLonghi Magnifica descaling procedure, see our Magnifica descaling guide.
Semi-Automatic Machines
(Breville Bambino/Bambino Plus/Barista Express/Barista Touch, DeLonghi Dedica/La Specialista, Rancilio Silvia, Gaggia Classic Pro, La Pavoni, Profitec/Rocket/ECM at higher tiers)
Semi-autos split into two sub-groups for descaling purposes.
With built-in descale function. Breville’s Barista Express/Touch series, newer Gaggia models, DeLonghi La Specialista, most machines with displays or programmable buttons. These have a dedicated descale mode triggered by a button combination — semi-automated cycle, takes 20-25 minutes, similar in concept to super-autos but with more user involvement (you may need to manually engage the steam wand for portions of the cycle).
Without built-in descale function. Rancilio Silvia, the original Gaggia Classic, La Pavoni levers, most prosumer machines from Profitec/Rocket/ECM. These require fully manual descaling: mix descaler in the water tank, pull “shots” of the solution through the group head (no coffee, no portafilter), open the steam wand to flush solution through the steam path, let the boiler sit with descaler in it for 15-20 minutes, repeat 2-3 times, then run multiple manual rinses.
The principle is identical to the automated version — descaler contacts the heating circuit, dissolves scale, gets rinsed out. The difference is attention. Manual descaling on a Rancilio Silvia takes about 45 minutes of active involvement rather than 25 minutes of waiting. Most owners of these machines treat it as a Saturday-morning task once every 1-2 months.
A useful note: semi-autos in the prosumer category (E61 group head machines, dual-boiler setups) often have manufacturer-specific procedures that differ from the generic flow. Always check the machine’s manual before applying generic descaling instructions to a $1,500+ semi-auto.
Pod Machines
(Nespresso Original, Nespresso Vertuo, Keurig K-series, Dolce Gusto)
Pod machines are the simplest descaling case. Dedicated descale mode, one button combination to enter it, fully automated cycle of 15-20 minutes including rinse.
Two specifics:
The first is descaler chemistry. Nespresso and Keurig both recommend their branded descaling solutions (citric-acid based on most modern units). Third-party “machine-compatible” descalers work for the most part, and generic citric acid solutions at the right concentration are commonly used by owners outside the brand ecosystem. Avoid lactic-acid-based descalers (like DeLonghi’s EcoDecalk) on pod machines unless specifically marked as compatible — different formulations target different scale chemistries.
The second is frequency. Pod machines generally descale less often than super-autos despite running similar water volumes, because the heating element is smaller and the internal pathway shorter. Most pod manufacturers recommend descaling every 3-6 months regardless of water hardness, with the machine’s indicator light as the override.
Choosing a Descaler
There are three categories of descaling product, with meaningfully different trade-offs.
Manufacturer-approved descalers. DeLonghi EcoDecalk, Breville’s branded descaler, Nespresso descaler tablets, Jura descaling tablets, Saeco/Philips descaler. These are formulated for specific brand machines — pH-balanced for the materials used in the heating circuit, with concentration and chemistry matched to the manufacturer’s procedure. Required for full warranty coverage on most brands. Cost: $10-15 per bottle or tablet pack, lasting 6-9 months on typical use. The premium isn’t large in absolute terms — about $1.50 per month of descaling.
Third-party “machine-compatible” descalers. Urnex, Cafetto, Durgol, and several other commercial brands produce descalers formulated for espresso machines generally, often with claims of multi-brand compatibility. Most are citric-acid or lactic-acid based with buffers and corrosion inhibitors. Quality varies — Urnex and Durgol have long track records in commercial coffee shops and are generally trustworthy. Cheaper unbranded “compatible” descalers off Amazon are higher risk and worth avoiding. Warranty coverage on third-party descalers depends on the manufacturer’s terms.
DIY (citric acid, vinegar). Both technically work — both are acidic enough to dissolve calcium carbonate. The practical problems are different for each:
- Citric acid: effective when properly dosed (typically 1-2% solution), but homemade solutions are unpredictable in concentration. Too dilute and the descaling is incomplete; too concentrated and it can pit aluminum components. No buffering means more aggressive contact with metal surfaces than commercial descalers.
- Vinegar (acetic acid): effective at dissolving scale but harsher on rubber gaskets than purpose-made descalers, and leaves a residual smell that takes 5-6 rinse cycles to clear. Most manufacturers explicitly warn against vinegar use.
The decision logic is straightforward. If the machine is under warranty, use the manufacturer’s recommended descaler — the warranty value substantially exceeds the descaler cost difference. If the machine is out of warranty and you’re comfortable with third-party products, Urnex or Durgol are reasonable alternatives. DIY descaling makes sense as an emergency option when nothing else is available, but isn’t worth the trade-offs as a routine choice.
What I use
De’Longhi EcoDecalk Universal Descaler (5 uses)
The bottle in my own cabinet — lactic acid based, works in any brand of machine, and one bottle covers about a year of descaling on a typical schedule.
Check price on AmazonAfter Descaling — What to Expect
A successful descaling cycle leaves the machine running noticeably better — sharper crema, hotter shots, more responsive steam. A few things can feel off in the first few drinks, all of which are normal:
The first 2-3 drinks may have a faint chemical or “different” taste, even after two rinse cycles. By the third or fourth drink, this should be gone. If it persists past five drinks, run another full rinse cycle (one tank of clean water through the brew head and steam wand). This almost always clears it.
Brew pressure may be slightly inconsistent for the first 3-5 shots. The cycle pulls a small amount of air into the heating circuit, and it takes a few brews to work out. If pressure stays low past 5-6 drinks, run a few hot water dispenses through the steam wand (no milk, 100-150ml each) to purge the circuit.
The descale light should turn off automatically when the rinse cycle completes successfully. If it stays on, the most common cause is that the rinse wasn’t completed in full — refill the tank to maximum with clean water and run another complete rinse. If that doesn’t clear it, see the machine-specific troubleshooting in your manual or in our brand-specific guides.
If the espresso tastes substantially different (not just “fresh after rinse” but actually wrong — sour, weak, off) several days after descaling, the descaling exposed an underlying issue that was masked by scale buildup. The most common case is a worn brew unit gasket, which is a separate (and inexpensive) repair.
How to Prevent Scale Buildup in the First Place
Descaling addresses scale that’s already formed. Preventing it from forming as fast in the first place is more efficient than dealing with it after the fact. Four things make a meaningful difference:
Use filtered water. A Brita pitcher or equivalent can significantly reduce hardness minerals before they reach the machine. The cost is trivial (a Brita filter cartridge handles a month of espresso machine water for under $5) and the descaling interval typically doubles or triples on hard water. Don’t use distilled water — it’s too pure and can damage some machines’ sensors that detect water presence.
Install an in-tank softener filter where supported. Most super-autos in the mid and upper tier support a built-in water softener filter (DeLonghi, Jura, Philips). On medium-hard water, this extends descaling intervals by 1.5-2x. On hard water, combining a Brita-filtered fill with an in-tank softener filter roughly halves overall scale exposure compared to filling from the tap.
Set hardness correctly. Most machines ship at level 4 (hard) by default. If your water is genuinely soft to medium, lowering this setting reduces unnecessary descaling cycles. Set it to match the test strip or utility report reading, not the factory default.
Empty the tank during extended absences. Stagnant water in a warm tank accelerates scaling and can introduce bacterial growth. Before a vacation, empty the tank and run a quick brew cycle to clear the lines. Refill with fresh water on return.
A useful comparison point: a DeLonghi Magnifica on soft municipal water with an in-tank softener filter goes 2-3 months between descalings. The same model on hard water without any filtering needs descaling every 3-4 weeks. The difference is entirely upstream of the machine.
Bottom Line
Descaling is the maintenance task with the biggest long-term consequences if ignored. Skip it long enough and the machine dies. Do it on schedule and the machine lasts twice as long as it otherwise would.
The conceptual process is the same across every type of espresso machine: descaler solution circulates through the heating circuit, dissolves accumulated scale, gets rinsed out. The specifics — buttons, durations, dosage, indicator light behavior — vary by machine. The decision tree is straightforward: figure out your water hardness, set it correctly on the machine, descale when the light triggers (or on schedule if no light), use a descaler appropriate to your machine type and warranty status.
For specific procedures on common machines, see our model-specific guides — the DeLonghi Magnifica descaling walkthrough is the most detailed reference; additional brand guides are in the works. For the broader question of which descaling product to use, the descaler vs DIY comparison will go into chemistry, cost, and machine-specific risks.
Frequently Asked Questions
How often should I descale my espresso machine?
It depends on your water hardness and whether you use a filter. On soft water with a filter, every 3-6 months. On hard water without filtering, every 3-4 weeks. As a default starting point, every 2 months matches most manufacturer recommendations for medium-hard municipal water. If your machine has an indicator light, follow it once the hardness setting is correctly configured.
Can I use vinegar to descale my espresso machine?
Technically yes — vinegar is acidic enough to dissolve scale. In practice, it’s a poor choice. Vinegar use may void warranty coverage on most brands, leaves a residual smell that takes 5-6 rinse cycles to clear, and is harsher on rubber gaskets than purpose-made descalers. Citric acid is a marginally better DIY option but still inferior to a manufacturer or quality third-party descaler.
What happens if I never descale my espresso machine?
Performance degrades progressively — espresso pulls cooler, crema thins, brew time increases — and then the machine eventually fails. The most common terminal failure is heating element burnout, which on home machines is usually not economically repairable. On home espresso machines, severe scale buildup is one of the most common reasons otherwise-fixable machines end up being replaced.
Does using filtered water mean I don’t need to descale?
No, but it significantly extends the interval. Filtered water (Brita or equivalent, plus an in-tank softener filter where supported) reduces hardness mineral content but doesn’t eliminate it. You’ll still need to descale — just every 2-3 months instead of every 3-4 weeks on the same source water.
How long does descaling an espresso machine take?
The cycle itself runs 15-20 minutes on pod machines, 20-30 minutes on semi-autos with descale function, 25-35 minutes on super-autos, and 45 minutes of active work on fully manual semi-autos. Add 5-10 minutes for a second rinse cycle. Total time including setup: 30-50 minutes for most owners.